Directions
To create a stereoscopic fusion image with multiple animation points and cross-merging effects, you can follow a structured process. This methodology will guide you in placing convergence markers and designing sub-images that activate when the viewer crosses their eyes or superimposes the images. Here's how to approach this in Photoshop:
Steps to Encode Multi-Animation Points:
1. Define Key Convergence Points
Identify multiple areas on both images where you want the viewer's eyes to converge. These areas are typically:
The center point between both characters (for the main merger).
The wings: Each wing's tip should merge to reveal hidden imagery.
Hands and feet of both characters: Align subtle elements that only appear when superimposed.
Chains and flowing lines: Design these to align and animate subtly when viewed as a stereoscopic image.
2. Create Complementary Layers
Left Image (L1): Begin with the left character in a pose, emphasizing their chaos (chains, hunched body). Highlight areas like the wing, feet, and chains where you'd like to hide sub-images.
Right Image (R1): Similarly, ensure the right character aligns perfectly with the left. The figure’s wings should stretch outward with dynamic lines, and additional elements (e.g., gears, glowing wings) should match points in the left image.
Design each matching point (wing tips, hands, chains) to contain complementary details that, when merged, reveal a third hidden image.
3. Strategic Use of Transparency and Layers
In Photoshop, create multiple layers of imagery at each convergence point. This will allow the hidden image to appear dynamically when the images are overlaid.
For example, one wing may contain intricate gears that, when the eye convergence happens, align with the left wing to form a circular object.
Use masking techniques to hide parts of these hidden images in each individual frame but allow them to appear when the two images are merged.
4. Design Hidden Sub-Images for Each Animation Point
Wings: For example, encode a pattern that becomes visible when the wing tips of both images align. One wing could contain geometric patterns while the other contains organic lines, and when merged, they form a mystical symbol.
Hands: The hands of both characters could align to form a third object (e.g., a glowing orb).
Chains: When the chains cross, they could form abstract shapes or reveal a hidden image of broken chains symbolizing freedom.
5. Add Depth Using the Sfumato Technique
Blend each layer gently using the Sfumato technique. This involves creating smooth transitions between light and shadow, as well as between different sub-images. The blurred edges will create an ethereal effect, making the transition between images seamless when merged.
6. Test Alignment for Viewing
Periodically test the alignment by viewing the images with crossed eyes. Ensure that:
Each convergence point aligns seamlessly.
The transitions are smooth, and hidden images are clear but subtle enough to be revealed only upon merging.
Adjust transparency, layer opacity, and positioning as needed to create a smooth fusion between the characters and sub-elements.
Example of Encoded Convergence Markers:
Primary Convergence Marker: The center where both characters meet and their wings align.
Wing Markers: The tips of the wings, revealing an additional hidden image (e.g., a glowing object or new symbol).
Hand Markers: The hands, when crossed, create a glowing orb or symbol, revealing a powerful emotional connection.
Chain Markers: The chains at the base, merging to symbolize the breaking of bonds.
By following this process, you'll create multiple sub-images that animate and merge seamlessly across the stereoscopic fusion. You can enhance the interaction with layers and depth by using Photoshop's masking and blending tools.
To design an image with multiple convergence points and stereoscopic animation effects, here's a step-by-step process, starting with a technical description of the image structure, using your dual-character model as an example. The focus is on creating multiple convergence markers that trigger additional sub-images and animations when the images are merged, such as the wings and other symbolic elements. This explanation also guides you in Photoshop or other graphic software to make your own animated stereoscopic image:

Step 1: Dual-Character Setup (L1, R1)
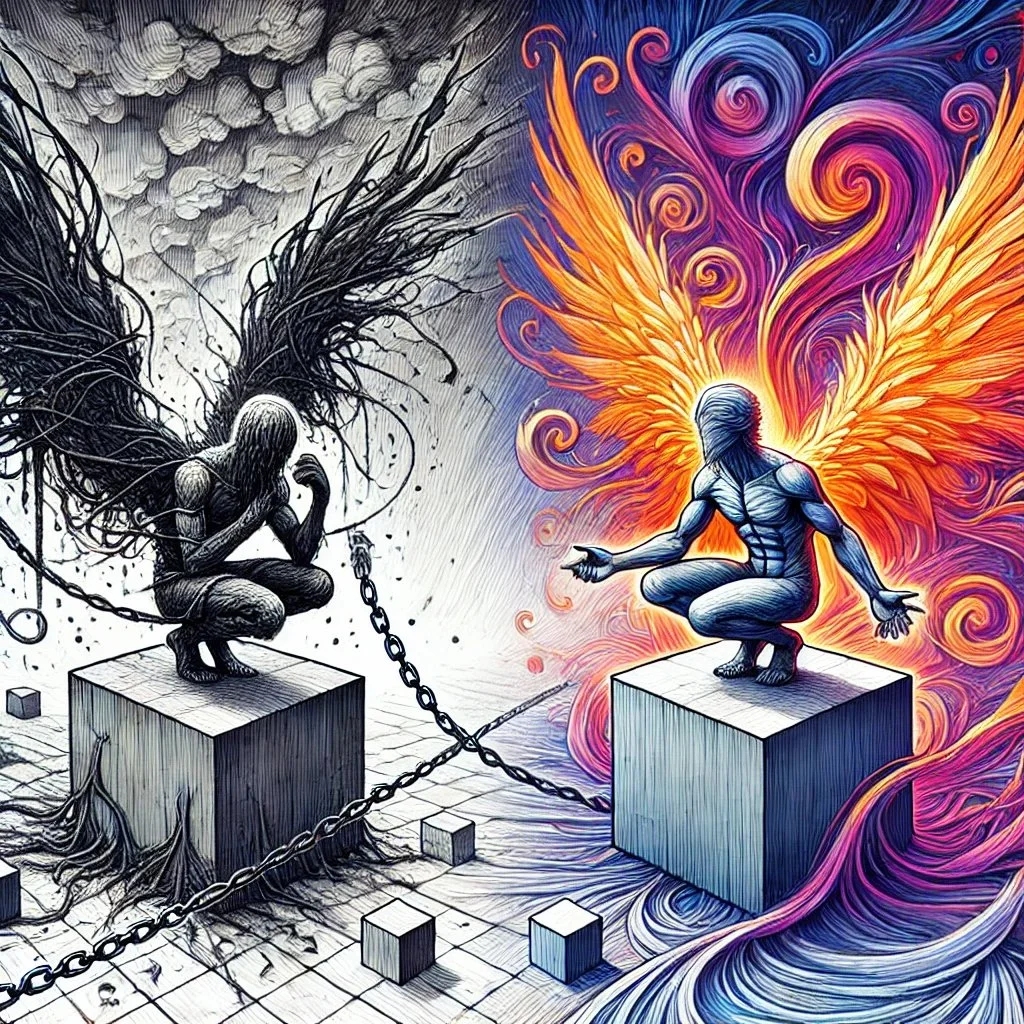
L1 Character (Left): The left figure represents fear and isolation, with tangled wings and chains. Place this figure in a crouched or weighed-down position, ensuring the chains extend towards the central cube. Their wings should be twisted and wrapped around them.
R1 Character (Right): The right figure symbolizes hope and creativity. Place this figure in a dynamic, upright pose with outstretched wings. The wings should flow upward, merging into colorful, swirling shapes (representing imagination and inspiration).
Convergence Concept: Each character must be aligned perfectly in the scene to allow cross-eye merging. This means both characters must be symmetrically positioned, but with a deliberate variation in wing position, gesture, and body posture so that the merge point creates a new action or figure.
This first stage demonstrates the setup of the two characters (L1 and R1) representing the dual forces of isolation and creativity. In this phase, the main focus is on clearly defining their poses, symbolic elements like the chains and wings, and the contrast between the dark and light backgrounds.
The next step would be to add Convergence Markers across key areas of the image, such as at the wings, chains, and imagination cloud. These markers will guide the viewer's eyes when crossing the images for the stereoscopic fusion, allowing them to focus on specific areas where the two sides merge into a single, unified image. I'll create the next image illustrating this.

Step 2: Design the Convergence Markers
Primary Convergence Points (CP1): These are located around the head, wings, and hands of the characters. When you cross the left and right sides, these points should align to form a single figure or animation sequence.
Wings: Design the wings with subtle variations on each side (e.g., slightly different feather shapes) so that they overlap to create a single fluid wing in the merged version. When the images converge at the wings, additional lines or textures could encode hidden elements.
Head and Hands: At the point where the heads merge, create an additional visual effect (such as light rays, a symbolic image, or abstract shape) that appears only when the heads are aligned.
Secondary Convergence Points (CP2): Place these points on the chains, the cube, and the base of the island.
Chains: Design chains that connect the left and right characters in such a way that, when they converge, the chains appear to break or fall away. The secondary chains will blend into each other, forming new shapes (like additional symbols or abstract lines).
Base/Cube: The cubes or bases under each character should have cracks or designs that extend into one another, and when combined, they reveal a deeper geometric shape or pattern, such as a symbolic glyph or abstract design.
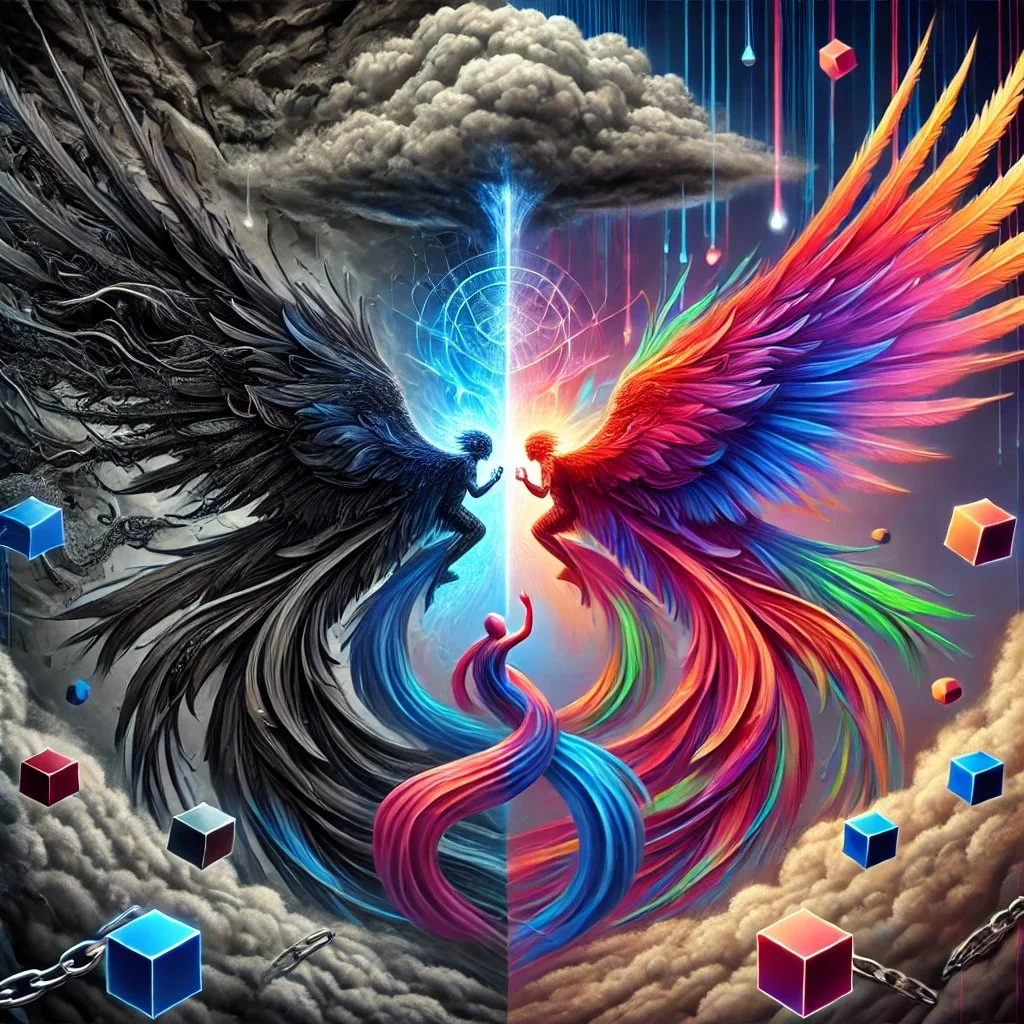
Here is the next stage, showcasing how convergence markers should be placed for stereoscopic fusion. This step aligns the critical elements like wings, chains, and the imagination cloud to ensure that they merge smoothly when viewed stereoscopically.

Step 3: Imagination Cloud and Background Merge
Left Cloud (Dark): Over the left character, create a chaotic stormy cloud with jagged, sharp edges. This represents internal struggles and dark thoughts. Incorporate textures such as smoke or lightning bolts that can converge into a larger shape.
Right Cloud (Colorful): Over the right character, design a vibrant, swirling imagination cloud filled with gears, colors, and flowing elements that symbolize creativity and invention.
Cloud Convergence: When the two clouds overlap during the stereoscopic view, they should merge into a whole brain or imagination symbol. The duality of storm and creativity fuses into a unified image, representing balance between these two forces.
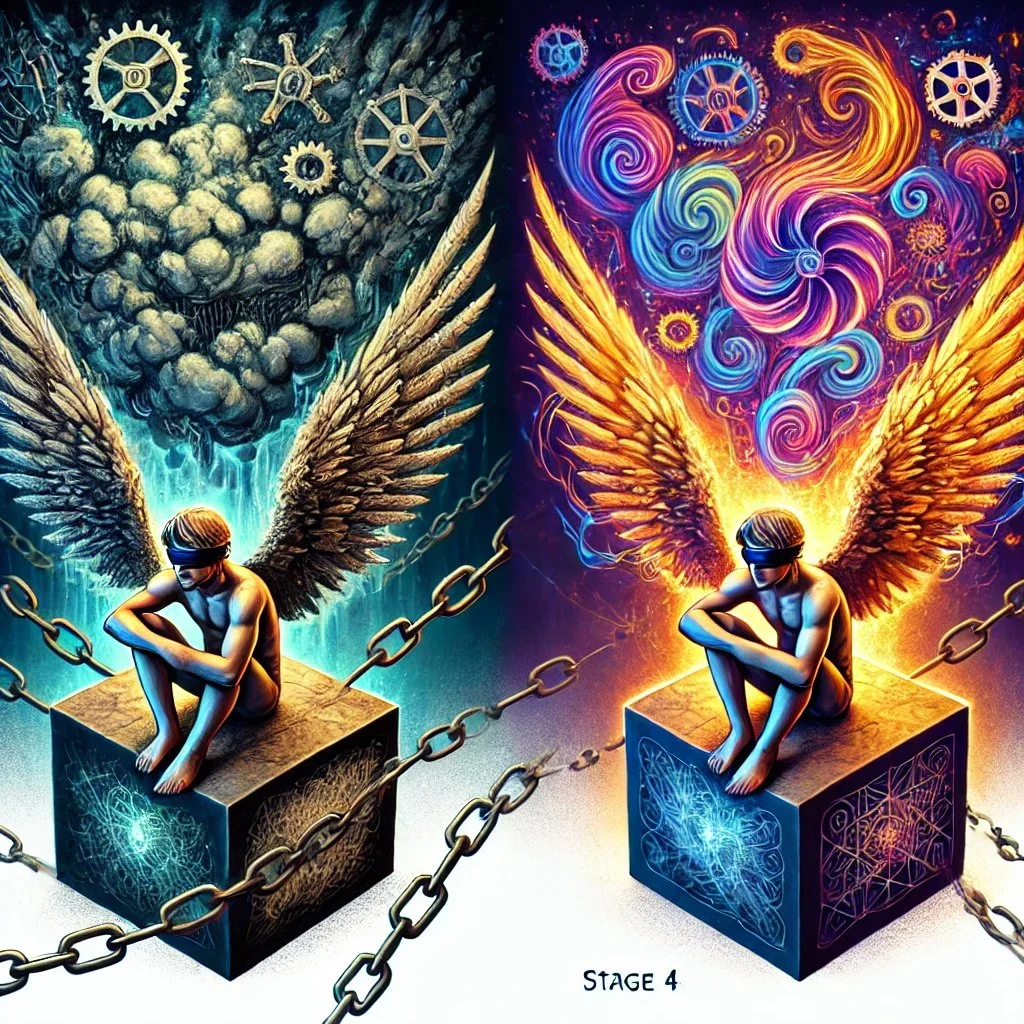
Stage 3 has been completed, showcasing refined textures, detailed character features, and the duality between chaos and creativity. The convergence markers blend subtly into the design, adding depth to the cloud and surrounding elements. Let me know if you'd like to move forward to the next stage!
Step 4: Designing the Sub-Image Layers
For this step, we are focusing on embedding hidden sub-images and elements within specific convergence points, which will only be visible when the two images are merged stereoscopically.
Key Elements to Include:
Symbols in Wings:
Hidden symbols like keys or abstract shapes should be embedded within the feathers of both wings. These symbols will only fully reveal themselves when the two wings from L1 and R1 merge.
Imagery Instructions:
Left Wing (L1): Include faint etchings of tangled roots or chains in the wing feathers, representing restriction. When merged, these roots should morph into geometric symbols like triangles or infinity loops.
Right Wing (R1): Subtle rays of light or intricate patterns should be embedded in the feathers, signifying freedom. When merged, these symbols could transform into abstract shapes like spirals or waves.
Encoded Animations in the Cloud:
The imagination clouds above each character's head should include encoded animations or textures that appear to move or transform when the images are merged.
Imagery Instructions:
Left Cloud (L1): Embed subtle shapes, like falling droplets or jagged edges, within the swirling clouds. When merged, these should transition into smoother, flowing lines or circular symbols, representing the shift from chaos to clarity.
Right Cloud (R1): Include swirling colors that, when combined with the left, shift into more vibrant, dynamic waves or gears, symbolizing innovation and creative freedom.
Chains Convergence Point:
The chains should also act as a convergence point, with hidden symbols or sub-images revealing a "breaking free" motif when merged.
Imagery Instructions:
Design the chains with subtle cracks or points of tension on both the L1 and R1 sides. When merged, the cracks should align to create the visual effect of the chains breaking or transforming into something lighter, like strings or rays of light..
Step 4: Designing the Sub-Image Layers (ALT)
For this step, we are focusing on embedding hidden sub-images and elements within specific convergence points, which will only be visible when the two images are merged stereoscopically.
Key Elements to Include:
Symbols in Wings:
Hidden symbols like keys or abstract shapes should be embedded within the feathers of both wings. These symbols will only fully reveal themselves when the two wings from L1 and R1 merge.
Imagery Instructions:
Left Wing (L1): Include faint etchings of tangled roots or chains in the wing feathers, representing restriction. When merged, these roots should morph into geometric symbols like triangles or infinity loops.
Right Wing (R1): Subtle rays of light or intricate patterns should be embedded in the feathers, signifying freedom. When merged, these symbols could transform into abstract shapes like spirals or waves.
Encoded Animations in the Cloud:
The imagination clouds above each character's head should include encoded animations or textures that appear to move or transform when the images are merged.
Imagery Instructions:
Left Cloud (L1): Embed subtle shapes, like falling droplets or jagged edges, within the swirling clouds. When merged, these should transition into smoother, flowing lines or circular symbols, representing the shift from chaos to clarity.
Right Cloud (R1): Include swirling colors that, when combined with the left, shift into more vibrant, dynamic waves or gears, symbolizing innovation and creative freedom.
Chains Convergence Point:
The chains should also act as a convergence point, with hidden symbols or sub-images revealing a "breaking free" motif when merged.
Imagery Instructions:
Design the chains with subtle cracks or points of tension on both the L1 and R1 sides. When merged, the cracks should align to create the visual effect of the chains breaking or transforming into something lighter, like strings or rays of light.

This image demonstrates Stage 5: Multi-Layer Animation in Photoshop, showcasing how the left character (L1) and right character (R1) are designed with subtle animations, convergence markers (CP1, CP2), and interactions between chains, wings, and clouds. The key focus is on how elements transform when viewed stereoscopically, creating new symbols and dynamic movements when merged. Each layer is transparent, allowing for an animated effect when combined.
Step 5: Multi-Layer Animation in Photoshop
Create Layers: Separate the wings, chains, and other convergence points into different layers. Adjust the transparency of each layer to create the illusion of movement or change when the images merge.
Layered Animation: Use Photoshop’s animation feature to create subtle movement between the left and right figures. For instance, the left character’s wing could “shake” or break free, while the right character’s wing lifts into flight.
Test the Merge: Cross the left and right images to ensure that when overlaid, they reveal multiple points of interaction. Use simple animation techniques to show these effects in real-time when the images are combined.
Summary of the Image’s Technical Structure
L1 Character: Represents chaos, with hunched posture, tangled wings, and chains.
R1 Character: Represents hope, with open wings and a strong pose.
Convergence Markers (CP1, CP2): Guide the viewer’s eyes to key points (wings, head, chains, cube) for merging into a new image or animation.
Stereoscopic Layers: Each part of the image (clouds, wings, chains) reveals hidden symbols or animations when viewed stereoscopically.
Step 5: Multi-Layer Animation in Photoshop (ALT)
This step involves creating subtle movement through layers, focusing on the wings, chains, and cloud. Each convergence point (like the wings) should not only reveal hidden images but also demonstrate a form of animated transformation.
Create Separate Layers:
Wings (L1/R1): Separate the left and right wings into different layers. Adjust the textures and transparency of the wings to show a "shaking" or "breaking free" effect when the wings converge.
Chains (L1/R1): The chains can be broken into segments, with the links showing subtle movements or cracks when the layers are combined.
Cloud (L1/R1): Use separate layers for the clouds to add subtle shifting or swirling animations. As the clouds merge, symbols or abstract shapes should appear, enhancing the sense of movement.
Layer Animation:
Use Photoshop’s timeline feature to create slight movements in the wings and clouds. For example, when the viewer crosses their eyes, the left wing (L1) should shake slightly, while the right wing (R1) lifts upward.
The chains should animate, showing slight cracks or tension as the images merge, representing the struggle between freedom and restriction.
Test the Merge:
After creating the layered animation, test the stereoscopic effect by superimposing the left and right images to ensure smooth transitions between the hidden symbols and animation effects.
Adjust the opacity or contrast of specific layers to fine-tune the visibility of the hidden elements and their transformation during the merge.